Architecture

|
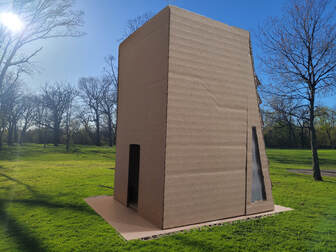
Title: Untitled
Size: 25 cm x 20 cm Medium: Recycled cardboard, Gorilla Glue, Scotch tape, and X-Acto knife Date of Completion: 4/22/24 This project is my first time attempting to create an architecture piece. The piece was created with cardboard and scotch tape and was put together using gorilla glue. It was inspired by the Institute for Contemporary Art in Richmond, Virginia that was designed by Steven Holl. This piece is designed to connect with my political theme when it comes to my artworks. It is supposed to convey a lack of privacy and a false sense of security. This is supposed to relate to the US government's attempts to push heavier monitoring onto the people.

|
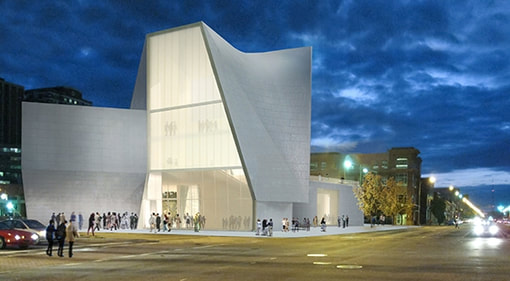
Inspiration- Steven Holl
Institute for Contemporary Art- Richmond, Virgina

|

|
Inspiration for my architecture model came from the work of the American architect, Steven Holl. In specific, my inspiration came from his design for the Institute for Contemporary Art in Richmond, Virginia. The reason I mostly found inspiration in it is because of its look. The look reminds me of the look that many modern homes possess. That being the angular ones that are usually white or black that are very open or have lots of windows. These are the types of homes I had in my mind while brainstorming possible designs for my model. However, unlike those homes, Holl’s design is a lot more unique and memorable than those types of cookie cutter homes. The building does contain that normal rectangular look, but a bunch of curves are interwoven into the design. It transitions seamlessly from shape to shape. At one point, it’s just a rectangle, but then it transforms into something a lot more trapezoidal. Then after the trapezoid comes some triangles. It's all very seamless. This is something that I wanted to try replicating in my own work.
This replication of technique came with varying success. I did end up creating a transition between shapes, but it is only between two shapes. These shapes are rectangles and triangles. From the door to the windows, everything is rectangular with no other shapes present. Beginning at the windows, is the start of a triangle that extends to the end of the model. It is at this triangular part that I think I was able to achieve seamless transitions between shapes.The side windows transition from a large triangle to an almost trapezoidal shape. In the main window, a much larger transition takes place. Descending from the top of the triangle is a rectangular piece. On this rectangular piece are many more rectangles. The triangle shows off a lot more transitions compared to the rectangular area.
This replication of technique came with varying success. I did end up creating a transition between shapes, but it is only between two shapes. These shapes are rectangles and triangles. From the door to the windows, everything is rectangular with no other shapes present. Beginning at the windows, is the start of a triangle that extends to the end of the model. It is at this triangular part that I think I was able to achieve seamless transitions between shapes.The side windows transition from a large triangle to an almost trapezoidal shape. In the main window, a much larger transition takes place. Descending from the top of the triangle is a rectangular piece. On this rectangular piece are many more rectangles. The triangle shows off a lot more transitions compared to the rectangular area.
Planning
When starting out the project, my class was instructed to focus our designs on specific words. From those words we would create small and rough models that would eventually become our final models.
Fear

|
For this model, I focused on the word “fear”. I wanted to connect this model to the conflict surrounding the US-Mexico border. So I created a wall with spikes jutting out of it to mirror the kinds of solutions certain politicians propose.
|
Defense

|
This model focuses on the word “defense”. This model changed a lot from when I first envisioned it. At first, I was making a home with many walls surrounding it. However, it eventually changed into a sort of military base.

|
Privacy


|
These final models focus on the word “privacy”. For these models, I was thinking of connecting it to government monitoring. So I decided to twist my designs into something with a lack of privacy. The model with the big circles is supposed to be a building with very large windows. Something that would make it very hard to have privacy. The more rectangular model came after. This model was meant to focus on creating a false sense of security. The pieces of paper jutting out from the piece are meant to be blinds of a sort. These were inspired by the ones I have in my own home. Staring at them directly would block your view, but looking from below would allow you to see what’s behind them. Anybody in my model would believe they are in a private space, but anyone from the outside would be able to see inside.

|


|
This sketch is what would go on to become my final model. Though it would receive one final addition. Aside from that, this sketch is what I worked from while creating my final model.
|
Process
Stage 1- Base

|
To begin my final model, I started with my base pieces which everything would stem from. These pieces were the doorway piece, the roof piece, and the floor piece. These were all very easy to cut out because they were simple rectangles. Though, I did run into a bit of trouble creating the doorway piece. It wasn’t that big of a deal because it really just consisted of being really careful not to cut too far and scar the piece. Aside from that, there was no trouble.
I already had experience in creating support structures for sculpture work. This experience came from working on my last cardboard sculpture. I applied all I learned from that project to this one. |
Stage 2- Walls

|
After I had finished constructing the base pieces, I moved onto connecting the wall pieces. These pieces were just as simple to construct and connect as the base piece. Since most of the pieces in this piece were rectangles, this trend of simplicity would continue for the duration of my time working on this project. That is until I decided to construct the window pieces.
|
Stage 3- Main Window

|
Once the wall pieces were finished, I moved onto creating the main window and emphasis of this piece. As was stated earlier, constructing rectangles was easy, however I did encounter a problem when it came to connecting these pieces together. The frame that the “window blinds” are connected to wasn’t long enough to connect to the floor piece. At the time, I saw this as a major problem, however I eventually came to the conclusion that I could simply shorten the floor piece.
The second problem was the “window blinds”. Though I was able to connect most of the pieces how I wanted to, some I wasn't. Some of the pieces jutted out farther than I wanted them to. This was after I glued them on so I didn’t want to remove them in fear of creating visible damage to the model. Thus I decided to leave them as they were. |
Stage 4- Side Windows

|
The final pieces I created are the side windows. These pieces caused me the most trouble.This problem mostly stemmed from the fact that I only had one blade for my X-Acto knife. The blade had severely dulled by this point and thus was unable to create a sharp corner. Since these side pieces were triangles, this left the top corner looking very rough.
Cutting out the space where the scotch tape/ “glass” would go was also a bit difficult. This was mainly because of how tight the space I was cutting was. Though the solution was as simple as “being careful”. Adding the tape was a bit tricky at first, but the solution was just making sure that the tape was tightly applied. 
|
Experimentation

|
Long before I had started on my actual final model, I had made several rough and small models. Among them were the three models that were made with paper. These models were my first attempts to use paper in order to create a model. It was while making these models that I had realized that I would not be using paper in order to create my final model. Though paper is very easy to manipulate, it was not as structurally stable as something like cardboard. This is why I decided to ditch the paper and to instead go with using cardboard for my final model.
|

|
This cardboard model was made to be a sort of proof of concept. Before I had actually started to construct the final model, I wanted to see how my idea would look and stand in the real world. It was through this model that I came up with the side windows. When I looked at the model before me, I felt that something was missing from it, which is why I went with the side windows.
|

|
I realized that there would be occasions when I would need to apply the glue to my model very precisely. This is something I learned from when I was working on my first cardboard sculpture. I knew that I would need something like a brush, however I had no extra brushes that I could spare. This constraint forced me to get innovative. I took whatever I could find around home and put together a makeshift brush. This brush was put together using strips of paper I cut up with my X-Acto knife which were taped together around an unsharpened pencil. As unconventional as it sounds, it ended up very useful for moments that called for precision

|

|
I used scotch tape when I was constructing my paper models, however this is the first time I attempted using tape as a visual in the model itself. It was a bit awkward using the tape at first because the tape would appear to end when it was applied. This was remedied by making sure that the tape was tightly applied.
|
Critique

|
|
|
Comparing
Both of our designs have a heavy focus on the use of shape. They both create smooth transitions between the shapes that are present. Rectangles to triangles, triangles to trapezoids, and vice versa.
Contrasting
Holl’s design includes a larger use of shape when compared to mine. My model is mostly made up of one rectangular prism. Less than half of it is made up of different shapes. Whereas Holl’s design is made up of a variety of different shapes.
Reflection
I’m not really sure how to feel about this piece. Ultimately, I feel like I achieved what I set out to do. My inspiration came from a building that was able to seamlessly transition between shapes and I was able to do that as well. I do also believe that I was also able to create a design that connects to my political theme. However, the large area that is just a rectangular prism really disappoints me. I do feel like I could have done more. In my quest to create something that stands out from a generic modern home, I can’t help but see my model as one. If my audience can look past this failure, I do hope they can understand why my model is designed the way it is.
Check list
ACT
Clearly explain how you are able to identify the cause effect relationship between your inspiration and its effect on your artwork?
- Steven Holl's design inspired my own use of shape.
What is the overall approach the author has regarding the topic of your inspiration?
- Document's Holl's work.
What kind of generalizations and conclusions have you discovered about people, ideas, culture, etc. while you researched your inspiration?
- Artistic places desire to have artistic architecture.
What is the central idea or theme around your inspirational research?.
- Steven Holl's work and designs.
What kind of inferences did you make while reading your research?
- Steven Holl intentionally designed the building with the shapes in mind.
Bibliography
Virginia Institute for Contemporary Art / Steven Holl - EVolo | Architecture Magazine. www.evolo.us/virginia-institute-for-contemporary-art-steven-holl/#more-17586. Accessed 25 Apr. 2024.
“STEVEN HOLL ARCHITECTS - INSTITUTE for CONTEMPORARY ART, VCU.” STEVEN HOLL ARCHITECTS, www.stevenholl.com/project/vcu-institute-for-contemporary-art/.
“STEVEN HOLL ARCHITECTS - INSTITUTE for CONTEMPORARY ART, VCU.” STEVEN HOLL ARCHITECTS, www.stevenholl.com/project/vcu-institute-for-contemporary-art/.
